Processing Film
Film processing is a seven-step process. Each step requires control of several variables: chemistry and dilution, time, temperature, and agitation. Another factor is volume of solution, which remains constant. The volume of solution (whether diluted or not) needed is enough to just cover the reel, in the tank. This volume is often printed on plastic tanks, but can be measured by putting the reel (with its insert if plastic) in the tank, filling it with water until the water just covers the reel, then pouring the water into a graduate to measure the volume.
The entire process takes about 40 minutes or so, and needs to be completed in a single session. Since you will have your hands in warm(ish) water for a lot of the time, it is highly recommended to make a visit to the restroom before you begin.
Most developers require some kind of dilution. Very common is using Kodak D-76 at a 1:1 dilution, which is one part stock developer, and one part water. So, begin by determining the developer dilution and volume. Most plastic tanks have the volume printed on them. If there is no indication, assemble the tank and fill it with water until the level is just covers the reel(s). Then pout this into a graduate to measure the volume of solution you need. If you are using a two-reel (or more), put both reels in.
If you are using a two-reel tank, you want to use the entire volume, even if you are only processing one roll. Only putting half a tank of solution leaves too much air space, which increases the agitation, and can cause excessive contrast.
Next, measure the temperature of the developer. It needs to be at exactly 68°F (20°C). This is critical. A variance of a degree or two one way or the other will affect the film. Use a water bath to raise or lower the temperature.
If using the above D-76 at 1:1, you can first measure the temperature of the stock (undiluted) developer. Then, since you are adding an equal volume of water, get that water to a temperature that offsets that of the developer to bring it to 68°. For example, if your developer is at 65°, then you would add an equal volume of water at 71°, to bring the working solution to 68°.
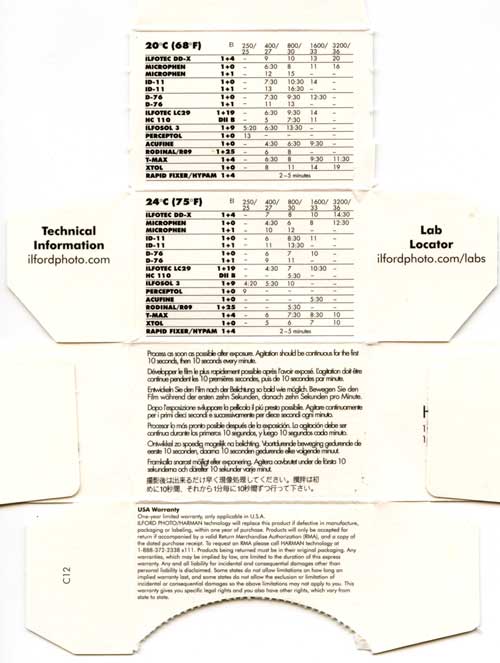
Once the developer is ready to go, make sure the timer is set for the correct development time, and you are ready to begin. The time and dilution for a particular film/developer combination can be found in various places: either inside the box the film came in, the manufacturer's web site (Ilford, Fuji) as well as that incredible resource, the Massive Development Chart. Keep in mind that any of these should be considered a recommendation, rather than a rule. Once you get consistent results with a combination, it may be altered to suit your particular needs.
The Steps
1. Developer
Pour the developer rapidly into the tank, holding the tank at an angle, to prevent trapping air. Secure the outside lid on the tank, start the timer and begin agitation.Agitate for the first 30 seconds, then 5 seconds every 30 until finished. (Some use 10 seconds every minute. Both methods work). In 5 seconds, you should get 3-5 inversions of the tank. Do not shake it. Use both hands and invert it. This will natural rotate the tank while inverting it. Set the tank down in the sink when not agitating.
Either before you begin, or some time during, measure out the stop bath. It is not diluted, it is a working solution, so you will need the full volume you used for the diluted developer.
With about ten seconds left, remove the outer lid and pour out the developer. Immediately pour in the stop bath.
2. Stop Bath
Using stock solution, agitate continuously for 1 minute.
When finished, pour out the stop bath. Save it for reuse, or later use in the darkroom. Indicator stop baths will turn to clear, and then usually purple as strength decreases. The timing here is not critical, but measure out the fixer, and pour it into the tank.
3. Fixer
Agitate for 10 minutes, continuously. when finished, pour it out. Again, save it for later use in the darkroom. A hypo-check solution can be used to test strength.
An alternative method is to use two separate fix steps, the first for 3-5 minutes with continuous agitation. Then replace the used fixer with fresh, and again agitate continuously for 3-5 minutes.
4. First Wash
Remove both lids (so that you can actually see the reel), and rinse in running water for 5 minutes in running water, or fill and dump the tank 5 times. This will remove the bulk of the fixer.
5. Wash Aid
Fill the tank with wash aid (Hypo-Clear), close it up, and agitate continuously for 2 minutes. Pour out the wash aid. Pour it into a graduate and check the color. Perma-Wash has an indicator. If there is a purple color, either repeat this step, extend the second wash, or both.
6. Second Wash
Again, remove both lids. Rinse under running water for 10 minutes, or fill and dump the tank 20 times.
7. Drying Aid
Fill the tank with drying aid (typically Photo-Flo). Agitate gently for 1 minute. Do not rinse. When finished, remove the reel and snap it in the sink a couple of times to remove excess liquid, and hang it to dry.
Clip the end of the film to a film hanger. Hook the hanger up (in a drying cabinet, to a line...) and gently pull the film off the reel. Some Patterson-type reels require you to actually open the reel by rotating one side forward until it clicks, then pulling the two sides apart. Don’t pull the film off the reel and hold it up to look at it. The drying aid adds an ionic charge to the film, and until it dries, the more you wave it around, the more dust will get sucked onto the film. This will show up when you go to make prints.
Do not squeegee the film. It will be fine. Any kind of squeegee action risks scratching the film. The film is particularly vulnerable to scratching when it is wet, as the emulsion is soft.
Let the film dry completely. Then put it in a negative sleeve, cutting it into strips to fit the negative sleeve. Clipping the leading corners on a strip makes it much easier to insert into the sleeves.