Presentation Basics
Presentation, and more specifically framing, is the final part of image making. In a large part the presentation can dictate the interpretation of an image. Throughout this section products are mentioned, and sources for these products may be included. These are recommended by me, and what I use. I recieve no compensation for recommending any product or service.
In General
When thinking about presentation, think in terms of standardization. This includes the sizes that your images are. Standardizing on a few sizes will save cost in that the presentation materials can be reused, by swapping out the images.
The Frame Package
The frame package consists of four parts. From the back of the frame, the package starts with a backing board. This adds rigidity to the whole package, and is usually foam board, although there are alternatives. This is followed by a mount board, to which the image is attached.
After the mount board, there is the mat (sometimes called an overmat). The mat isolates the piece visually from the frame. More importantly, it keeps the piece from coming in contact with the glazing, the last part of the package. The importance of this is paramount. Any print that has any kind of gelatin can stick to glazing simply due to high humidity. Pieces that have clay coatings on them can also glue themselves to the glazing, with a surprisingly amount of moisture.
In some mounts, a mat is not used. Instead, spacers are used to prevent the piece from coming into contact with the glazing.
The Frame
The whole package goes into the frame, which holds it together, and forms the last part of the barrier against airborne pollutants. The frame should complement the piece, and not become a statement unto itself. The frame becomes a visual break between the piece and its surroundings.
Frames need to fit the piece. For matted or floated pieces, a working minimum is two inches of space all the way around. Another working rule of thumb is to use the next standard size up for the frame, or jump a standard size. As an example, a 35mm negative printed full frame on 8 × 10 paper will be 6 × 9 inches. Put in an 11 × 14 frame, this leaves a 2½ inch border or mat all the way around.
The Wire
Unless the piece is unusually heavy, it should be hung with picture wire. This is the easiest method for hanging, and is most secure, when done correctly. Small rings and sawtooth hangers are difficult to hang, and make things like getting a pieces to align much harder.
The hangers for the wire should be placed at 1/4 of the height of the frame from the top. It should be pulled tight. Picture wire will stretch a bit, so there is no need to leave slack in it. At 1/4 of the height down, the piece will lie flat on the wall. Screw eyes can be used for smaller pieces, up to about 11 × 14″, and strap hangers should be used on larger pieces.
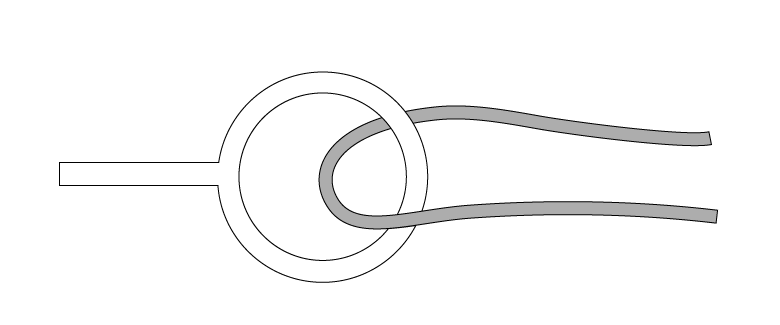
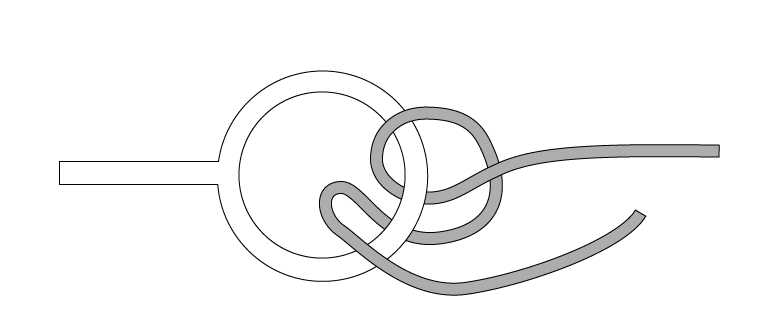
Use proper picture wire, of braided steel. There is a lot of other stuff out there, but the braided steel simple works best (OOK makes a deluxe Framer’s Wire, that is, well, deluxe). The wire should loop through the hanger, go around itself, then loop back through. Then twist the ends around. Pull it tight: