Building Frames: Keyed Miters
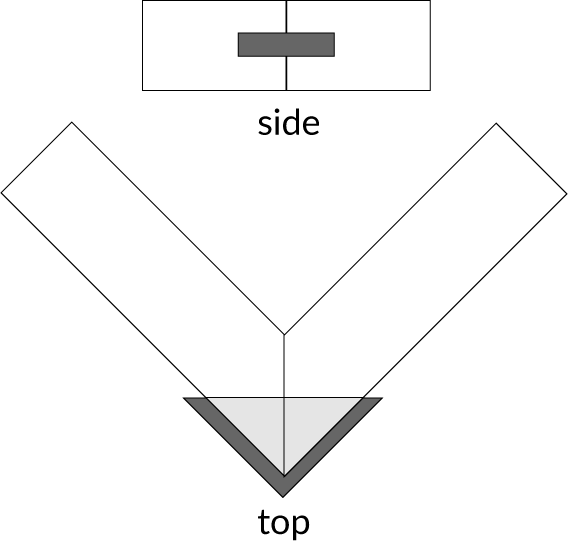
The major problem with miter joints is that they are inherently weak. With a miter, you are gluing end grain to end grain. The end grain tends to absorb a lot of glue, and the glue is the only thing holding it together. Perhaps the best way to strengthen a miter joint is by using a key, which is slotted in across the joint. This method provides a lot of gluing surface, as well as a cross-grain attachment.
The Jig
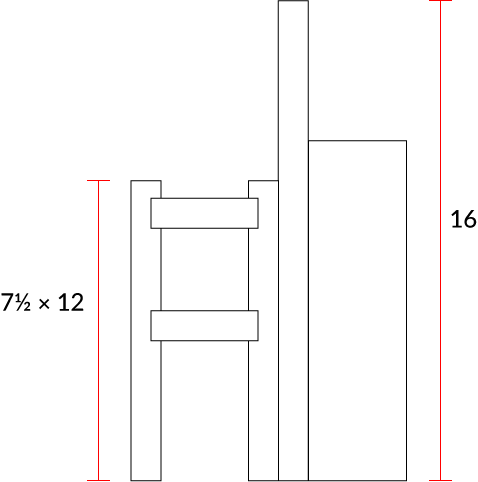
To cut the key slots, a jig is used on the table saw. The jig is a cradle that hold the frame sides at a 45° angle to the saw table. The one described below snugly straddles the saw fence. The dimensions are variable, with those given taken from mine.
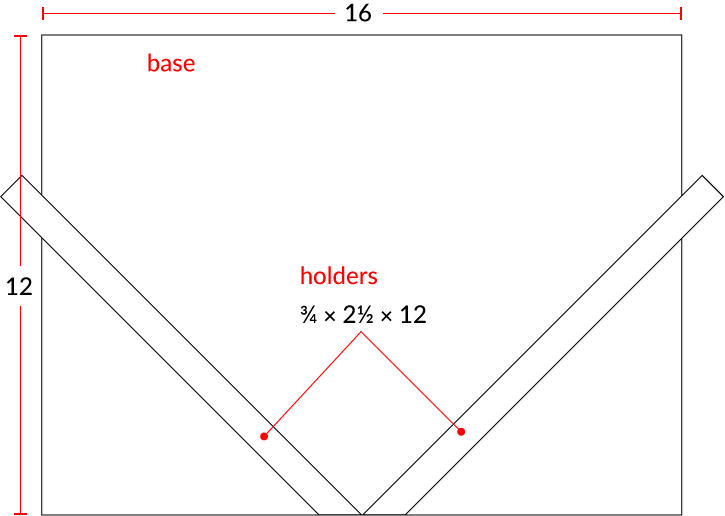
| Amount | Dimension | Material |
|---|---|---|
| 1 | 12 × 16 | plywood |
| 2 | 7½ × 12 | plywood |
| 1 | 2 × 12* | plywood |
| 2 | 2½ × 12 | 1× stock |
Again, the dimensions are variable. My jig was made of scrap that I had around, and is somewhat oversized.
- Miter one end of both of the 1× stock.
- Carefully mark the 45° angles on the main vertical, on both sides. Glue and clamp the 1×s, alinging them carefully. Pre-drill and secure with screws from the opposite side.
- Dry fit the saddle, clamping it around the table saw fence. It should fit snugly, without a lot of wiggle, but still be able to slide along the fence easily.
- Once the fit is satisfactory, assemble the saddle, again using glue and screws.
- With the two components assembled, clamp them together, and attach with screws and glue.
Using the Jig
The jig is placed with the saddle straddling the table saw’s fence. A frame side is placed in the holder, with the front or top of the frame towards the fence. With a dado blade set for ¼″, the depth should be set for the width of the miter, and the distance from the fence to the center of the height of the frame.
Cut the key slot in one end of the frame side, then move it to the side of the jig and cut the second side. Do this for all four sides of the frame, keeping the top of the frame sides towards the fence. Doing this will keep the slots at the same height, even if the centering is off a bit.
The Keys
The keys are cut from ¼″ stock. If the frame is ¾″, a 1 inch wide strip should be enough. Iuse a contrasting wood (my frames are usually maple, and I use walnut for the keys), but of course the same wood can be used. The keys should be oversized, allowing them to be trimmed, rather than trying to get an exact fit while gluing up the frame. Rip the strip first, the use the saw’s miter gauge set at a 45° angle to make a series of crosscuts, flipping the strip each cut to make triangular keys.
Assembling the Frame
Before any glue, dry fit the frame together. The keys may need to be sanded a bit. Fit each corner, and keep the keys in their respective corners. Once the keys have been fitted, apply a good wood glue to all mating surfaces, and assemble and clamp the frame. I first apply glue to the miters and slots, then to each key, fitting the corner as I go.
Once assembled, the frame needs to be clamped for at least 30 minutes. I use two sets of the Veritas® 4-Way Speed Clamps, one under the keys, and on set over the keys. I have found these clamps to be the best and easiest for building frames.
Finishing
Once the glue is dry (the frame can come out of the clamps after thirty minutes, but the glue needs a bare minimum of about two hours to set), the keys can be trimmed off. I use a Veritas Molded-Spine crosscut saw, but a flush-cut saw from the big box stores works just fine. Then I use a block plane to trim the stubs of the keys flush with the frame sides, but they can also be sanded. Knock the edges of the frame all the way around, so that the actual finish will adhere. I use 200 grit sandpaper for that task.
Finally, apply a coat of finish. There are lots of options here, but I use a coat of shellac as a sealer, followed by three coats of polyurethane. Options include oiling, staining, waxing, or simply leaving them raw. Try some different options. It just depends on the look you want.