Building Frames: Workflow
There are a couple of different ways of going about building frames. It depends on what you have to work with as far as tools go. The simplest shop can produce frames with a table saw and a miter saw. More elaborate set-ups give you more options.
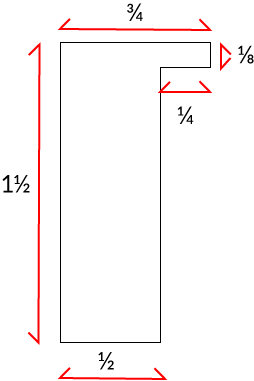
The basic profile is 1½ × ¾. This is deep enough for most needs, including using spacers. It can also be made from stock 1 × 2 boards. When making the molding, be sure to make a bit of extra, for test cuts.

Bare Essentials
A hand saw, a table saw, and a miter saw is all you need. This set-up limits you to using S4S boards, in particular 1×2s. Either method requires using a zero-clearance throat insert on the table saw. The workflow is as follows:
- Using the hand (crosscut) or the miter saw, cut the stock to rough length. Add at least an inch to what the frame package will be. So an 11 × 14 package will need two sides of at least 12 inches, and two at at least 15. Makes the cuts straight across, the miters will be cut later.
- Next, begin forming the molding. This can be done with a regular blade, using two cuts, or with a dado set. With a regular blade, set the blade height for 1/4 inch to make the face cut. The boards are run through the saw flat, With the edge of the kerf (the cut) 1/8 from the outside of the board. Make as many test cuts as need to get the height and distance correct. Make this cut on all the boards.
- The cheek cut is made with the board upright. The blade is set for 1 3/8 high, the fence set to 1/2 from the inside edge of the kerf. It is a good idea to use a featherboard on the feed side, to keep the board firmly against the fence.
- With a dado blade set, the molding can be formed in one or two passes. One pass is fine for softer woods like pine or poplar, but with oak, cherry, or maple, two passes will usually make a cleaner cut. Set the blade set for 3/8 if making one pass, or 1/4 if using two passes. Get the height set, and do a test cut. Once the height is good, run all the boards. Using two featherboards will greatly reduce blade burn.
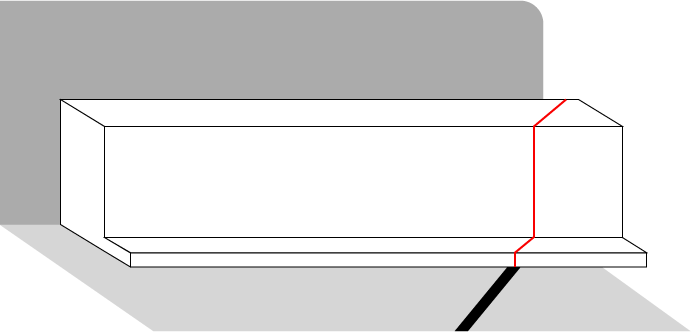
- With the molding made, cut the miter on one end of each board. Set the boards in the miter saw with the lip side down when making the cuts.

- Carefully measure for the second miter. Add 1/16th of an inch to the inside measurement. This will allow for a small amount of wiggle room for the frame package. Use a ruler to measure, rather than a tape measure, as it is easier to be more accurate. Mark and cut one of each length.
- Use the first lengths to mark the next. Line them up carefully and mark. Using the actual lengths will help prevent measuring errors. Cut the miters.
The frame is now ready for gluing up. The miters need to be reinforced, however. There are several ways of doing this. A V-nail tool, or press can work, particularly with softer woods. More traditionally, small brads are nailed in from the side, after being pre-drilled. The strongest way is to use a wooden key, which crosses through the joint.
Planer (and Maybe Joiner)
The addition of a planer, and maybe a joiner, greatly increases the variety of boards that can be used. The process is much the same as above, except getting the boards ready.
- Using S3S boards, the first thing is to cut them to rough length, as above.
- If the boards are to be flattened, this can be done now, with a hand plane. There's a good article here, so as to not repeat it. If a power jointer is available, it's easier to flatten after ripping to width.
- Next, the boards will need to be ripped (cut along their length) to rough width. This is done on the table saw. Set the cut for about an eight inch wider than the finished width.
- With the boards ripped, joint a side and a face to get a square edge.
- Now move to the planer and plane te boards to thickness. Go slow, and do not try to remove too much at a time.
- Now, with the boards at thickness, make one more rip pass, on the side opposite the jointed side, to get the boards to the correct width. Then proceed as above to create the profile.